
©Pat Ashforth & Steve Plummer 2021
©Pat Ashforth & Steve Plummer 2021


CHARTS
Understanding our charts, and how they work, is key to knitting from one of our patterns or for designing your own charts. Familiarise yourself with the method before you begin.

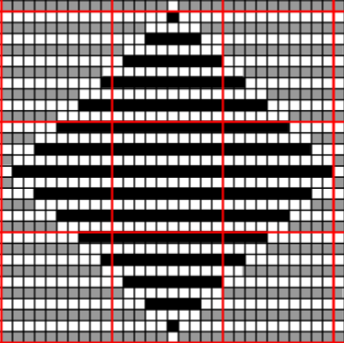
The black grid represents stitches. There are 31 stitches across the chart. They are divided by red lines every ten stitches to make it easier to find your place as you are knitting.
Going up the chart the stripes represent the stripes in the knitting. There are 31 stripes. These are not rows. Each stripe is made up from two rows. We refer to the stripes as ridges of knitting.
Two colours are used to create the design. We refer to the colours as light and dark, so you can substitute any colours you want. The ridges are worked in alternate colours -
You can see three colours on the chart. In addition to the light and dark colours, there are some white squares. Some of these are on light ridges, some are on dark ridges. They represent purl stitches, whichever ridge they happen to be on.
To work from a chart
Right side rows are always knit.
On the wrong side rows the coloured-
On the chart you are looking at the right side of your image. All of the shading is created on the wrong side, which is knitted from left to right.
To make the square
Ridge 1: Using light, knit the right side row. On the wrong side, knit the grey stitches and purl the white stitches. The chart shows k15, p1, k15
Ridge 2: Using dark, knit the right side row. On the wrong side row, knit the black stitches and purl the white stitches. The chart shows p15, k1, p15
Ridge 3: Using light, knit the right side row. On the wrong side, knit the grey stitches and purl the white stitches. Ridge 4: Using dark, knit the right side row. On the wrong side row, knit the black stitches and purl the white stitches.
Continue in this way until you have completed all 31 ridges. Cast off.
Here is a chart for a very simple square.

Notes
Because the square is symmetrical you would get the same result, whichever direction you work the chart. It is vital to work in the correct direction if you are using lettering or some other directional design.
In many cases you can count the cast-
Depending on what you are going to use it for, a design may need to begin and end with the same colour ridge.

Pdf charts
Charts in downloadable pdf documents are much clearer than those shown on the tutorial pages.
| The Gift of Life |
| Merry Christmas |
| Drawing Programs |
| Using Inkscape |
| Modelling Programs |
| George Maffett's Introduction |
| Art tutorials |
| Geometric tutorials |
| Video tutorials |
| Maple Leaf |
| Tiger |
| Maple Leaf : Part 1 |
| Maple Leaf : Part 2 |
| Maple Leaf : Part 3 |
| Tiger : Part 1 |
| Tiger : Part 2 |
| Tiger : Part 3 |
| Tiger : Part 4 |
| Tiger : Part 5 |
| Tiger : Part 6 |
| Tiger : Part 7 |