

©Pat Ashforth & Steve Plummer 2021
©Pat Ashforth & Steve Plummer 2021

DIRECTIONAL SHADOWS

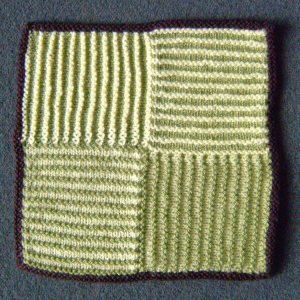
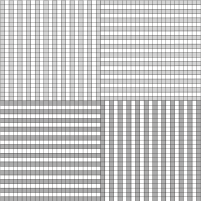
These simple stripes have green standing out on two squares and yellow standing out on the other two. All four squares look different because they are also in different orientations.
To knit a single square (Square 1)
Using Dark, cast on 23 stitches. Count this as the first row of the first ridge.
Ridge 1 -
Ridge 2 (Light) : Knit the first row and purl the second.
Ridge 3 (Dark) : Knit both rows.
Ridges 4 -
Keep the stitches on a stitch-
To knit a group of 4 squares
Make Square 1.
Square 2
Turn Square 1 sideways and, using Dark, pick up one stitch from the end of each ridge (23 stitches). Count this as the first row of the first ridge.
Work as for Square 1. Cast off.
Square 3
Turn work sideways and, using Light, pick up one stitch from the end of each ridge (23 stitches). Count this as the first row of the first ridge.
Ridge 1 -
Ridge 2 (Dark) : Knit the first row and purl the second.
Ridge 3 (Light) : Knit both rows.
Ridges 4 -
Square 4
Work as for Square 3 joining the new square to the stitches on the stitch-
Join by putting the stitches from the holder onto another needle and knitting the last stitch on the new square with the next stitch of the stitches from the holder.
The photo shows the squares with a two-
You could go on adding squares in any direction, leaving live stitches where you may want to join on more squares later. It is not always possible to make every join by knitting the pieces together. You may get some gaps which have to be closed by stitching.
Many of the ideas in Woolly Thoughts (book) will help you to create designs with squares.
If you are using several squares in combination, you will need to think carefully about the colour of the beginning and ending ridges of each colour. The squares shown in the design above have an odd number of stitches so that they can have an odd number of ridges and begin and end in the same way.
4 3
1 2
| The Gift of Life |
| Merry Christmas |
| Drawing Programs |
| Using Inkscape |
| Modelling Programs |
| George Maffett's Introduction |
| Art tutorials |
| Geometric tutorials |
| Video tutorials |
| Maple Leaf |
| Tiger |
| Maple Leaf : Part 1 |
| Maple Leaf : Part 2 |
| Maple Leaf : Part 3 |
| Tiger : Part 1 |
| Tiger : Part 2 |
| Tiger : Part 3 |
| Tiger : Part 4 |
| Tiger : Part 5 |
| Tiger : Part 6 |
| Tiger : Part 7 |