

©Pat Ashforth & Steve Plummer 2021
©Pat Ashforth & Steve Plummer 2021

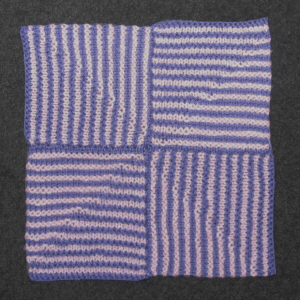
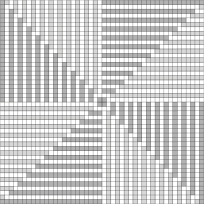
WINDMILLS
The pink triangles form one windmill, the purple triangles form another. Because of the orientation of the squares it isn’t possible to see a ‘solid’ windmill at one time. Two triangles of each colour are always ‘solid’. The others show the colour to varying degrees, depending on the angle. As you move round the windmill parts appear more clearly, then disappear again, in rotation.
These squares can be used in other arrangements for different interesting effects.
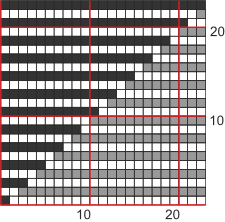
To knit a single square (Square 1. The thick red line shows where you begin)
A provisional cast-
Cast on 23 stitches.
Ridge 1 (Dark) : Knit the first row. On the second row knit the coloured stitches and purl the white stitches.
The chart shows k1, p22
Ridge 2 (Light) : Knit the first row. On the second row knit the coloured stitches and purl the white stitches.
The chart shows p2, k21
Ridge 3 (Dark) : Knit the first row. On the second row knit the coloured stitches and purl the white stitches.
The chart shows k3, p20
Ridges 4 -
Cast off on the second row of ridge 23.
To knit a group of 4 squares
Make Square 1 (As above).
Square 2
Turn Square 1 sideways and, using Dark, pick up one stitch from the end of each ridge (23 stitches). This counts as the first row of ridge 1.
Ridge 1 -
The chart shows k1, p22
Ridge 2 (Light) : Knit the first row. On the second row knit the coloured stitches and purl the white stitches.
The chart shows p2, k21
Ridge 3 (Dark) : Knit the first row. On the second row knit the coloured stitches and purl the white stitches.
The chart shows k3, p20
Ridges 4 -
Square 3
Work as for Square 2.
Square 4
Work as for Square 2
Unfasten the provisional cast-
by grafting the live stitches to the ends of the ridges of square 4
or by placing the two pieces right sides together and working through both of them to cast off the live stitches.
If you want to neaten the edges, work along one side at a time and pick up one stitch from the end of each ridge and one stitch from each cast-
You can make the borders wider by adding extra rows of garter stitch.
Some suggestions:
Make separate squares and stitch them together in any orientation you want.
Change the size of the triangles by starting with more stitches and working more ridges at the bottom of the chart.
Reverse the direction of the colour divide by working the chart the opposite way round.
It is even possible to use several colours in designs like this (although it is rather more complicated to use several colours at the same time as creating the illusion). See Shadow Triangle Cushions.

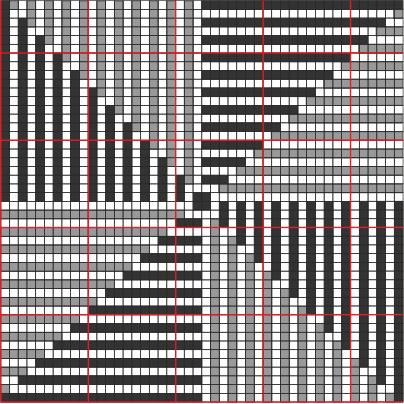
2 1
3 4

| The Gift of Life |
| Merry Christmas |
| Drawing Programs |
| Using Inkscape |
| Modelling Programs |
| George Maffett's Introduction |
| Art tutorials |
| Geometric tutorials |
| Video tutorials |
| Maple Leaf |
| Tiger |
| Maple Leaf : Part 1 |
| Maple Leaf : Part 2 |
| Maple Leaf : Part 3 |
| Tiger : Part 1 |
| Tiger : Part 2 |
| Tiger : Part 3 |
| Tiger : Part 4 |
| Tiger : Part 5 |
| Tiger : Part 6 |
| Tiger : Part 7 |